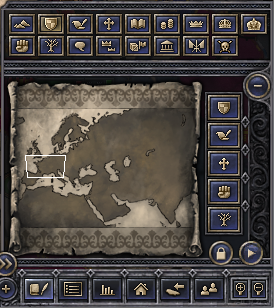
You can mod the minimap, as well as all surrounding buttons. If your custom map is not the same size as the vanilla map, and as a result your minimap will have a different shape as well, then you may want to do some minimap modding.
minimap_area.dds
This file, located in Crusader Kings II\gfx\interface, is the image you see in the bottom right. Make your own. There are three other relevant files:
- minimap_area_bg.dds - this is located behind the minimap image. You can make the image completely transparent, and ignore it. Otherwise it might just get in the way.
- minimap_bg - this is the background (the "window") that appears around your minimap whenever you have the mapmode buttons hidden. If you mod your minimap menu so that it is no longer possible to hide the mapmode buttons, then you can ignore this file.
- minimap_bg_big - this is the background you usually see.
main.gui
Located in Crusader Kings II\interface, this is the relevant file to position the minimap and everything around it. Copy the entire file to your mod directory. At the very top of your copied file you will find the following code:
iconType = {
	name ="minimap_pic"
	spriteType = "GFX_minimap_area"
	position = { x=-259 y=-199 }
	Orientation = "LOWER_RIGHT"
}

# TODO: we should use a button instead for minimap...
# or its own type, this is a ahck to deal with transparency
# in the minimap icon
positionType = {
	name = "minimap_size"
	position = { x=183 y=120 }
}
The iconType block does not matter at all! Any changes are ignored by the game, however that does not mean it is wise to remove it. Just let it be as it is.
The positionType block however affects your viewbox. If you change the position to match the size of your custom minimap image, then the viewbox will be able to go everywhere inside your minimap. If your image would be 183 by 180, it would be:
position = { x=183 y=180 }
Once that is done, the actual interface modding comes up. First scroll down to this part:
########################################
########    MINIMAP AREA   #############
########################################

windowType = {
	name = "minimap"
	backGround =""
	position = { x=-280 y=-248 }
	size = { x=256 y=125 }
	moveable = 0
	dontRender = ""
	horizontalBorder = ""
	verticalBorder = ""
	fullScreen = no
	Orientation = "LOWER_RIGHT"
The way the minimap window works is that everything around the minimap_area.dds image moves according to that image. So if you have a square minimap as opposed to the vanilla rectangle minimap, and want to move your minimap slightly up so that it fits within the background frame, then that means everything else needs to be rearranged as well.
First off, change the size to match your image. For example, my image was 183 by 180, so I now have:
size = { x=183 y=180 }
You can move the minimap image itself around by changing the position. My 183 by 180 image had to be moved up 30 pixels. Thus the new y would be -248 - 30 = -278, which results in the following line:
position = { x=-280 y=-278 }
But if you load your game, everything around the minimap will be out of position! In addition to the background image (and the background image if the mapmode buttons are hidden), there are three buttons, five custom mapmode buttons and a window with all regular mapmode buttons. They all have code similar to the following:
iconType = {
	name = "minimap_bg_big"
	spriteType = "GFX_minimap_bg_big"
	position = { x=0 y=-38 }
	Orientation = "UPPER_LEFT"
}
Adjust the position of this iconType, as well as the other ones, to match your new map position. The three buttons (toggle_mapmodes, minimap_lock, and minimap_toggle) can be "removed" by moving them out of the way. If you want to disable the hiding of the mapmode buttons, you can simply set the position of that button to be off screen, using some huge value for x or y:
guiButtonType =
{
	name = "toggle_mapmodes"
	position = { x = 3000 y = -100 }
	quadTextureSprite ="GFX_minimap_toggle_mapmodes"
	Orientation = "LOWER_RIGHT"
	pdx_tooltip = "SHOW_MAPMODES_TOGGLE"
}
You can also do the same with the custom mapmode buttons.
Finally, the regular mapmode buttons themselves are located within a windowType block. If you want to keep the vanilla layout (two horizontal lines of buttons), you can simply change the position of the windowType to move all of the buttons. If you want to change the layout (for example, to two vertical lines), the position of the individual buttons must be adjusted.
Once all this is done, your minimap and its surrounding buttons are ready!
See also
- Interface modding
- Map modding, for making custom maps
| 歷史 | 角色 • 家族 • 省份 • 頭銜 • 劇本 |
| 腳本 | 指令 • 條件 • 作用域 • 修正 • 事件 • 決議 |
| 常規 | 定義 • 遊戲規則 • 另類開局 • 宗教 • 文化 • 政體 • 特質 • 血脈 • 科技 • 法律 • 建築 • 宣戰理由 • 朝貢國 • 單位 • 目標 • 疾病 • 死亡 • 榮譽頭銜 • 社團 • 寶物 • 地圖外政權 • 內閣成員 • 貿易路線 • 繼承 • 奇觀 • 稱號 |
| 圖像/音效/本地化 | 地圖 • 圖形 • 盾徽 • 肖像 • 介面 • 小地圖 • 音樂 • 本地化 |
| 其他 | 故障排除 • 驗證器 • 控制台指令 • 編輯遊戲存檔 • Steam創意工坊 • EU4轉檔器模組製作 |
