(merge from offical wiki) |
小 (RemixMe移动页面Creating a mod至创建模组) |
(没有差异)
| |
2019年3月3日 (日) 14:19的版本
This tutorial explains in details the steps required to create a basic mod.
Note that another approach is to copy/paste and modify an existing mod (though not a mod installed via Steam Workshop since these are packaged differently).
It is assumed that the OS is Windows, but this could apply to MacOS or Linux with few changes.
Prerequisites
- Install a good text editor (like Notepad++), since default Notepad on Windows screws the file encoding.
Steps
Create the CK2 mod directory
There are 2 different directories involved:
- The CK2 install directory: it contains the base game files, which should not be modified directly and considered 'read-only' (modifications will be lost when Steam is updating). It can be found via Steam: find CK2 in your games library, right click on the name and select properties in the menu. Choose the local files tab and then press browse local files.
- The CK2 user files: it contains the user data (saves, game preferences, logs and mods). The path is
~/My Documents/Paradox Interactive/Crusader Kings II/.~is the home directory, depending on your configuration and Windows version, this could look like:C:\Users\<YourUser>\Documents\Paradox Interactive\Crusader Kings II
Tip: you may create shortcuts to these directories on your desktop.
Step 1: Create a mod folder ~/My Documents/Paradox Interactive/Crusader Kings II/mod/, if it doesn't exist.
Note: there is also a legacy common\Crusader Kings II\mod\ folder in the CK2 install directory, but it must not be used to store mods.
Create the .mod file
The .mod format here is just a plain text file, saved with .mod file extension instead of the .txt extension.
Tip: most CK2 files use .txt extension, but there is also .csv (localization), .gfx (graphics), .sfx (sounds), .gui (interface), .lua (global variables) and .info (documentation).
Step 2: Create an empty file named "mymod.mod" in the CK2 mod folder (~/My Documents/Paradox Interactive/Crusader Kings II/mod/mymod.mod).
Note: make sure the file extension is .mod (and not .mod.txt) - disable "Hide Known Extensions" option of Windows explorer.
Step 3: Open the file with your editor and add:
name = "My mod"
path = "mod/mymod"
Notes:
- Don't forget the quotes, it is mandatory in case there is a space.
- Save the file with ANSI (Windows-1252) encoding. This is true for all CK2 files: never use UTF-8 encoding (with or without 'BOM') !
Tip: the path is relative to CK2 user directory, hence the "mod/" prefix.
Create the mod data folder
Step 4: Create an empty folder named "mymod" in the CK2 mod folder (~/My Documents/Paradox Interactive/Crusader Kings II/mod/mymod/).
Tip: best practice is to use same name for path folder than the mod file name, so that they are next to each other when browsing the CK2 mod folder.
Note: folder and file names are case sensitive on OS other than Windows, so a best practice is to use only lower-case.
Making a game modification
We need a little change that will be quickly visible in-game, to validate that the mod is working.
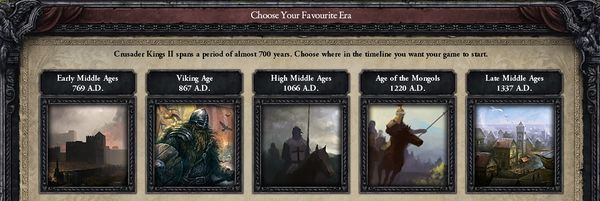
Let's do some basic localization modding and change the text "Choose Your Starting Era" on the lobby to "Choose Your Favourite Era" (the corresponding localisation key is PICK_YOUR_STARTING_ERA)
Step 5: Create an empty folder named "localisation" in the mod data folder (~/My Documents/Paradox Interactive/Crusader Kings II/mod/mymod/localisation/).
Notes:
- A mod follows the same folder structure as the base game, and the two are merged when loading in memory.
- Beware the folder has to be named "localisation" and not "localization" !
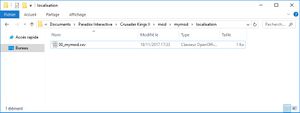
Step 6: Create an empty file named "00_mymod.csv" in that folder (~/My Documents/Paradox Interactive/Crusader Kings II/mod/mymod/localisation/00_mymod.csv).
Tip: the "00_" prefix is to ensure our localization is loaded first and overrides the vanilla one. Each folder has its own loading order/overriding behavior.
Step 7: Open the file with a text editor and copy the following lines to the file and save:
#CODE;ENGLISH;FRENCH;GERMAN;;SPANISH;;;;;;;;;x
PICK_YOUR_STARTING_ERA;Choose Your Favourite Era;;;;;;;;;;;;;x
That's it !
Testing the mod
Step 8: Activate the mod "My mod" in the launcher (and don't activate any other mod) and start the game.
Troubleshooting: if the mod doesn't show up in the launcher, it probably means the .mod file is not in the correct folder or has the wrong extension (.txt instead of .mod).
Tip: notice that the in-game checksum has not changed compared to the one from the launcher. This is because the localisation folder doesn't alter the checksum, as it's only a cosmetic change.
Step 9: Click on Start and verify that the title of the pop-up has changed.
Troubleshooting: if the change is not visible in game, or the game crashes, check for errors logged by the game at startup in error.log.
Step 10: Take some time to congratulate yourself, and go back for more modding !
Note: each time you modify something in the mod files, you need to stop and restart CK2 so that the change is taken into account.
What's next ?
- Mod other game files. Take it slowly, with small challenge, one problem at a time !
- Register your CK2 game and ask for help on the Crusader Kings II - User Modifications forum
- Upload your mod to the Steam Workshop
- Zip the mymod.mod and mymod folder together into a mymod.zip and upload the mod on the forum
External links
- Guide: Your first mod - to add an event option.

